So, going along with that, this tutorial will not include a specific pattern but just a set of 'guidelines' to show you how you can go about cutting and piecing together your own capes for your kidos to enjoy! I hope you like them! Please let me know if any (or all) of this is confusing, missing steps or just odd. I've never done anything this in-depth and I hope it is relatively easy to understand. I appreciate any feedback you have for me and any comments (as long as they're not terribly rude) that you may have. All comments will be moderated, so if I don't like it; I won't post it! Blogger's prerogative! (But seriously, let me know I want to get better at this and make things people can use and understand!)
First thing first. I used flannel fabric for my capes. This was mainly because I wanted them to come out like blankets. I have a hope that if they kids really like them and want to sleep with them they will be like blankets and will be easy to wash and use over and over. I am all about comfort and the snuggle factor and I know my kids are too. All three of my babies are big snuggle kids and have blankets, stuffed animals, etc. that they sleep with so this was a major factor for me. You don't have to use flannel for your capes, I just prefer it and found it made a nice sturdy, solid cape that wasn't overly heavy.
What you will need:
 |
| This is the fabric I used for one of the capes for my youngest nephew. He loves trains and I love dinosaurs. They don't particularly coordinate, but I like the way they go together. |
 |
| Fabric for my niece's cape. These go so well together. The green of the frog fabric matches the bow on the Scottie perfectly! |
 |
| The fabrics for one of my oldest nephew's capes. Both sides are a bit busy but things he loves. They don't have to look good together, just be things they will love to imagine and play with! |
- 1 yard each of 2 coordinating (or not) fabrics, flannel or cotton. The fabric MUST be washable.
- Velcro
- A plate or other round object for the pattern (optional)
- Whatever you like to use for cutting, piecing together, marking fabric, etc. I use a pencil, my clear quilters ruler, my cutting mat, good Fiskars Scissors, pins, and my rotary cutting tool.
- Your iron, ironing board and potentially spray starch and/or water.
- You will also need a large surface area to work on to do all of the patterning, cutting, pinning and piecing. (I like to work on the floor in my living room or kitchen on the hard wood as it gives me plenty of space but a good sized table would work great!)
Iron all your fabric. This is the most important thing to do throughout the process. Iron, iron, iron. I am a big fan of the impact that ironing can make on your work. It will flatten out your fabric to make sure you have a nice smooth surface to work with. When you have ironed out each yard, fold it in half right sides in (wrong sides facing out) and press out a nice seam at the middle. This will be the center of the cape and will help you when it comes time to make the pattern and cut out the pieces. Do this with both yards of the flannel or cotton. Place both pieces together, one on top of the other. This way you will draw your pattern out on the top pieces and cut both pieces at once.
 |
| This is both pieces of fabric for one of Paul's capes. They have both been ironed and have a nice pressed center 'seam'. I have placed both fabrics together to prepare to draw out my pattern. I will draw the pattern on the Spiderman fabric but will cut both fabrics at once. |
Step 2
Now we'll draw out the pattern. There are two sizes I used. Since Paul is 2.5 his capes were slightly smaller. Kayla & Nicholas are 7 and 6.5 so their capes needed to be a little bigger.
First we'll draw out the line for the neck piece.
 |
| At the top of your fabric place your ruler/flat edge and draw in 5-6 inches for the neck. I used 5 inches for Paul and 6 for the older 2. With the fabric folded this will end up being 10 and 12 inches raw. |
 | |
| For Paul I measured down 22 inches and Nicholas & Kayla 26 inches. To measure, start at the neck line and measure down the center pressed seam using your rule or measuring tape the length that you want your cape to be. Make an indicator at the spot where you want the length to end. You can adjust your size according to the size of your children and the size you want their finished cape to be. I did not want my capes to be long where the children will be tripping over them or they will be getting caught. But, I wanted them long enough to 'grow' with them for a little while. Measure accordingly. |
 |
| At the mark indicated for the final length of the cape, line up your ruler. Draw out the bottom line of the cape. I chose to go the entire width of the fabric. The bigger, the better. But, you can make it smaller if you wish. |
 |
| For this I just eyeballed the angle from the end of the neck line to the edge of the bottom line. Line them up as best you can and draw it out. Be sure to go over all your lines to make sure they are very visible. You will want to be able to see them well when you are cutting to make sure you get everything well cut. |
 |
| This is what your fabric will look like with the pattern when you are all done with the initial drawing. |
 |
| Lay the plate on the fabric like this and simply trace around the right edge of the plate that lies in the pattern. |
 |
| Here is the final drawn pattern. This is the small pattern for one of Paul's capes. Thus the large amount of extra fabric at the bottom. |
Now its time to Cut!
 |
| With both pieces of fabric still together, start cutting. Keep them nice and flat, laying on your surface and cutting slowly. It saves so much time and will keep your pieces identical if you cut them together. Just take your time!!!!!! I usually cut all the straight lines first, then come back to do the rounded corner. It makes things easier and leaves me nicer squares of remnant fabric to work with later on. Be sure to use good scissors. I am a fan of Fiskars. In this photo I am using my Titanium non-stick scissors, but also use my rotary cutting tool (also Fiskars) to cut on my cutting mat. Invest in good scissors, it is worth it! |
 |
| Here are the fabrics, still folded all cut out. |
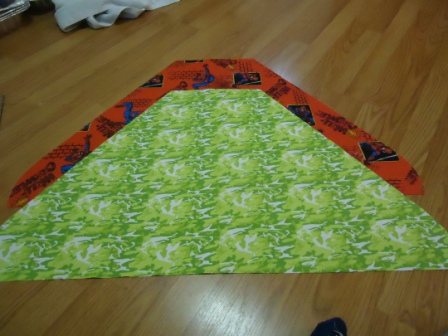 |
| Same fabrics, opened up, after cutting. Much bigger and exactly the same. Love it! |
Now we need to cut and make the tabs that will hold the capes on when they are worn. This is pretty simple and straightforward.
 |
| You will need 2 pieces of each fabric in a 3 inch by 5 inch rectangle. Measure, draw and cut them out. |
 |
| Here are my 4 pieces. Nothing fancy, just 4 rectangles. I use the same size regardless of the age/size of the child. These seem to be pretty functional for all ages. |
 |
| Pin 1 of each type of fabric to its opposite right sides together. Pin at the corners. |
 |
| Sew up three sides of the tabs. Turn out the fabric to the right side and press out the seams. I use 1/4 inch seams for all seams on my capes. Each tab will have one side of each type of fabric. |
 |
| Cut approximately 4 inches of Velcro for each tab. Place opposing sides of Velcro on each of the 2 tabs. Put the Velcro on different sides of the tabs. This way they will come together to close nicely when they are attached. Pin in place roughly in the middle of the tab, at approximately the same place at the top of the tab. (Measure if you want, I'm not that picky anymore.) |
Step 5
Now we'll start pinning together and sewing the entire cape. Once its all said and done this part (if done right) goes relatively quick and will be done in a jiff!
 |
| Place the finished tabs on one side of the fabric. You will need to lay the tabs with the opposite side facing up. Line up the raw edge side of the tabs to the raw edge of the cape. Next, lay the other cape piece on top right sides together (the wrong side will be facing up toward you). Pin the tabs in place first to make sure they stay. Then start pinning the entire way around the fabric, lining everything up as well as you can. |
 |
| Here are the 2 pieces of the cape right sides together (wrong sides out). I have pinned around the edges to completely secure the 2 pieces. This photo is along the bottom of the cape. Toward the middle of the bottom I have placed several pins in the opposite direction of the rest of my pins. This is an indication for me that I will stop sewing here to leave an opening to turn my fabric. I have found this is the best way to remind myself so I don't get carried away with my work. When you come to the first pin when sewing, back stitch 1 or 2 times to re-enforce the stitching for when you turn the pieces. Tie off and then pick up on the other side of the opening. Do the same with the back stitching there and finish stitching around the rest of the cape. Again, I use a 1/4 seam for all of my work. You may use a larger seam or whatever you are comfortable with. |
Step 6
Now its time to finish your piece. Unfortunately I forget to get pictures of this part. But, here's what you do. Once you have sew it up, turn the piece right side out. Press out the seams and press the seams under for the opening where you turned it right side out. Pin that area together. Be sure to iron around the seams of your entire piece. This helps to 'bond' the stitches and makes a better look for the entire piece. This is true for ANY sewing project!
 |
| This is the bottom of my piece where the opening was. After it was ironed and pinned I began to sew around the edges. I sewed here first to close the hole, then to make the cape look uniform and have a more finished look I sewed around the entire edge of the cape. This is about an 1/8 inch seam. It has to be much smaller to 'catch' that seam where the hole is and will also look a little better for the finish work. |
 |
| Finished Cape! This is one of the larger capes. |
 |
| This is one of the smaller capes for my 2 year old nephew. |


