Today I was home sick. I woke up this morning with a sore throat and little to no voice. With rest today, its coming back, but this is annoying. This is my 5th case of laryngitis in the last year. Its not contageous, just me. If not for my stupid stomach and espopheagus not working right this wouldn't happen. But, we're working on that and maybe I'll be over this in another couple months.
After sleeping til past noon, and watching a bit of TV, I was bored. So, I decided to work on something I've been wanting to make. Simple, easy, functional and quick. I was done with the whole project in less than 45 minutes. And since I needed to have some photos for my blog, I turned it in to a tutorial.
Here they are, today's photos in the form of a tutorial for a Digital Camera Case.
 |
| This is my camera. A Sony Cybershot. I was lucky enough to get it for Christmas from my parents and I LOVE IT! |
|
 |
| My first step was to measure. My camera is approx. 2.5 inches wide by 3.5 inches long. So i made my fabric pieces (1 lining, 1 outside piece, 1 piece of pellon interfacing) 13 inches long by 4 inches wide. I used all remnant fabric from old projects. So, not only was it lovely, it was economical too! |
 |
| Next I ironed the lining and exterior piece to get them nice and smooth and flat. |
 |
| I often like to use a little bit of spray starch to add stiffness and help get out any major wrinkles. |
 |
| Next iron the interfacing to the wrong side of the exterior fabric. I have tried making projects where I put the interfacing on the lining and it just never works out as well. Be sure to follow the manufactures directions for the type of interfacing you are using. I always use Pellon 808. I should start buying the stuff by the bolt. |
 |
| Next pin the two fabrics together right sides facing each other. (With the blue cotton there really is no wrong side, but if you were using something that had a right and wrong side, be sure to place the right sides facing each other.) |
 |
| Sew the 2 pieces together leaving about an 1.5 inches open on one end of the strips. |
 |
| Trim the edges off the fabric. |
 |
| At the corners make an angle cut so that the corners when turned will lay nicely. |
 |
| Use the opening to turn the fabrics right side out. |
 |
| Turned out strip of fabric. |
 |
| Iron the piece out to press out all seams and to press the ends under at the opening to create a new seam. |
 |
| Pin the open edges together. Sew close to the edges to finish the seams. |
 |
| Fold up the bottom portion of the strip of fabric to create a 'pocket'. Leave approx. 1.5 to 3 inches for the flap. |
 |
| Sew up the sides, being sure to sew close to the edges to keep the pocket as wide as possible. |
 |
| See how snugly she fits in the pocket. |
 |
| And this is the perfect size for my Blackberry as well. That will be my next project to create a custom case for my BB. |
 |
| Now, its time to sew a button hole to pull the camera strap through for ease in carrying. First decide where your opening will need to be on the flap. It should be right on the crease where the flap folds over to the front. I measured to find the middle and then made about a half inch line for the hole. Draw a guide on to help you see exactly where to make your button hole. I used pencil since when I'm done this portion will be cut and covered with thread. |
 |
| Use the button hole feature on your machine. The first several times i made button holes I carefully followed the instructions in my sewing machine manual. I suggest you do the same. |
 |
| Make sure to attach your button foot and get your seam ripper out. You'll need it in a moment. |
 |
| Follow the manufacturer's instructions and sew your button hole. It should look something like this! Then use your seam ripper to tear the fabric between the sewn sides. Be careful not to rip any stitches or the whole thing will fray out. |
 |
| This is what the button hole will look like with your strap pulled through. |
 |
| Now, its time to add some closures. I chose snaps, mainly because i have a lot of them. Position your snaps on the fabric where they will meet easily to close your pouch. Now hand sew them on tightly. More is better to help keep them on for a long time. I used the same thread I used on my machine to hand sew the snaps on. |
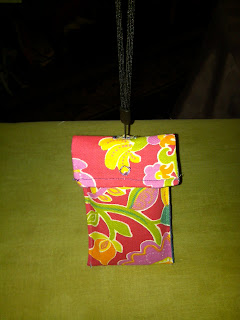 |
| And here you have it. A cute, small, easy, economical camera case. Perfect to toss in my purse and keep my camera from harm. As you can see where I sewed the snap on I was careful to keep it neat so that it looks like a pretty little diamond on the exterior of the flap. Hope you enjoyed this tutorial and if not at least were mildly interested in some of my photos. |


Look at you!!! That is SO cute and clever!
ReplyDeleteI really need to get a sewing machine, I really want to try out a few craft things....and to make stuff for Henry :)
Yes, you totally need to get a sewing machine. Its so much fun. I make purses and bags, and all sorts of things. It is a great distraction when I'm not feeling great too!
ReplyDeleteBut, don't worry either way Henry will have plenty of homemade things. :)